CLICK HERE FOR FREE BLOG LAYOUTS, LINK BUTTONS AND MORE! »
Showing posts with label Decorating. Show all posts

Tuesday, June 15, 2010

Ikea Inspiration

I mentioned in my May favorites that we had recently taken a trip to Minneapolis. Since we were there we of course had to stop at Ikea! I can't wait until we have a house and can really shop there and implement their ideas and products. I wanted to share with you some of the things and set ups that caught my eye.


I love this dining room table and chairs. You know I love all things black and white so this set up is right up my alley. I also love the dishes and centerpiece. I have 3 of those candlesticks (they are in our bedroom). I love how they lined them down the center of the table...I will have to remember this!


These are some of the light fixtures that caught my eye. There were a lot of cool ones. This is one reason I can't wait to have a house. I would love to have some of these light fixtures.


I love this closet! I dream of having a huge closet someday. Something pretty and organized like this would be great- just add one of those awesome light fixtures to it. Someday....


I have had my eye on this mirror for awhile. I absolutely love it. I just wish I had a place to put it.


This bedroom caught my eye. It is very pretty, but not very masculine....

Have you been to Ikea lately? What are your favorite Ikea products?

Monday, April 5, 2010

Spring Decor

I hope you all had a great Easter! We had a weekend full of family and yummy food...it was a lot of fun! Since Spring has officially sprung here in Iowa, I wanted to share a little of our Spring decor.

I will start with our kitchen table. I bought a couple bags of river rock at the Dollar Tree to fill my Pier 1 candle vase. The plant is one I have had from Ikea. I bought the plate from Marshalls a few months ago. I love it! I am using it to hold our fresh veggies. I can't wait for the farmer's market to start! The little outdoor candle holder and watering can are from the dollar spot at Target. I bought the fake white flowers at the Dollar Tree to fill the watering can. The table runner was a wedding gift from Target. It has been so versatile. I have been able to use it for all seasons.


The corner of our kitchen counter was the first thing I decorated for Spring. The only new things I bought for this were the blue and white plates and the woven cups. The plates were on sale at Target for like $0.80 each. John and Sherry on Young House Love have some of these woven cups that I have admired. I found some of my own at Marshalls recently. I think they are so cute!

I also made a few changes to the bookcase. I framed some of our professional wedding pictures and put them on one shelf. The second shelf has a stack of my favorite decor magazines with a candle and glass dish with shells we found in Mexico on it. I bought the frames from Goodwill a year ago and painted them white. I printed a map of Canada, the United States, and Mexico and put it in one of the frames without the glass. I am going to buy some pins to stick on the map of the places Lee and I have been together. Lee and I love to travel so it will be a good way to keep track and show all the places we have been. I think the starfish frame is my favorite. It is so simple but I love it. I bought a piece of scrapbook paper and the starfish from Michales and put them in the frame again without the glass. The plant is another one I have had from Ikea.

What do you think of everything? Have any of you been doing any Spring decorating?

Monday, March 22, 2010

Garden Windows

I am in LOVE with garden windows right now. Definitely need to have one of these someday....


All images are from centsationalgirl.com - go check out her kitchen. It is gorgeous!

Wednesday, March 17, 2010

How To Make a Cake Stand

Many bloggers have been using cake stands to decorate with. I love the look and have been wanting one but didn't want to spend a lot of money. I looked for one at places like Goodwill and thrift shops and couldn't find one. I decided to try to make one myself. I started out looking for some type of taller dish and a plate. I was shopping at Marshall's one day and came across a really lucky find. I found this stand in the clearance section that would make the perfect cake stand bottom for only $0.70! I bought this quiche dish at Marshall's a few weeks later to use as the top of the cake stand for $4.99.


I only plan to use this for decoration purposes so I used super glue to attach the top dish to the bottom stand. I had super glue on hand but you could use epoxy as well. Here is the finished product that came in at a grand total of $5.70!

Wednesday, March 10, 2010

DIY Art

We have a lot of DIY art in our home. I like to be reminded of the people and places we love and have meaningful and interesting "art" around us.

Since we were just married in September, we have a few special pieces framed from that day. One of my aunts wrote a very meaningful letter to go with the gift they gave me at my wedding shower. I framed that letter and it hangs on the wall of our bedroom.
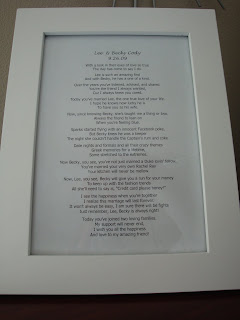
Another reminder of the day that I framed is the maid of honor speech my friend Amanda wrote. She wrote a poem that talks about our friendship and my relationship with Lee. (I know...she is so clever! Best MOH!)

I made this simple piece on the computer. It is just a fun way to display our wedding date in the collage we have on our bedroom wall.
The last 2 pieces are in our master bath (although they used to be in our dining room of our old apartment). I made this painting a few summers ago. I bought the canvas and spray painted it brown. After it fully dried, I dipped the top edges of a bucket and a smaller cup in paint and put them randomly down on the canvas. It turned out pretty well. I like that the circles aren't perfect and there are a few paint splatters.

The last piece of DIY art I will show you cost less than $1. I bought this chunky frame at Goodwill and spray painted it brown. I went to Menards and picked up a few paint chips (for free!) that matched the other art in the room. Then I just cut up the paint chips and arranged them on the cardboard back of the frame and taped them down....cheap, simple and cute!


Have you guys done any DIY art recently? Do you have any fun personalized pieces in your home? I want to hear your ideas!

Wednesday, March 3, 2010

How To Make a Headboard

There are many DIY headboard instructions out there. Mine are a combination of trial and error and reading many other headboard instructions. There are a few things I want to point out. We used a foam mattress pad that we bought at Wal-Mart. We found this to be MUCH cheaper than buying foam at a quilt shop. Also, we used a white flat bed sheet from Wal-Mart instead of fabric. I wanted a white headboard so this again was a MUCH cheaper option than buying white fabric. Make sure you iron the sheet before making the headboard. We used a heavy duty picture hanger to hang the headboard to the wall. I hope you find these instructions helpful. Happy headboard making!

Supplies:
Lightweight Wood (cut to size)
2-3” Foam (we used a mattress pad)
Quilter’s batting
Fabric (we used a bed sheet)
Spray Glue Adhesive
Button-Making Kit
Long Upholstery Needle
Washers
Fishing Wire
Drill
Staple Gun

Instructions:
1. Cut your wood (or have hardware store cut it) to size.
2. Measure out and mark where you want the button tufting to go.


3. Drill holes in the board where you want the buttons.

4. Spray one side of the board with the spray glue and place the foam on top. Trim off any extra so the sides are even with the board. Note: If you are using a mattress pad like we did, make sure the flat side is up. Do not glue the flat side to the board.


5. Spray the top of the foam with the spray glue and cover with the batting. Make sure there is enough batting on all sides to wrap around to the back of the board.

6. Let it sit for 10 minutes to make sure everything stays glued down. Flip it over so the batting and foam side is face down. Wrap batting around to the back of the board and staple into place.
7. Lay the fabric (bed sheet) on the floor with the back facing up. Make sure the fabric is flat and there is enough on all sides to wrap around to the back of the board. Lay the batted side of the board down on the fabric and position it in the center of the fabric.
8. Starting with the middle of the headboard, wrap the fabric around the board pulling tightly. Staple every inch or so until you get all the way around the headboard. Make sure you are keeping it pulled tight. Fold and staple the corners like you are wrapping a present.

9. Cover the buttons with your fabric and follow the instructions to make them on your kit.
10. Take your upholstery needle and fishing wire and poke through the back of the headboard to the front through the hole you drilled. Once you are through the front, string the button and poke back through the hole to the back. String the washer on the fishing wire and tie tightly to get the tufted look.


11. Repeat the above step for as many holes as you drilled.

Wednesday, February 3, 2010

Easy Updates: Kitchen

We have recently done a few things to spruce up our kitchen decor. Come take a look around.....

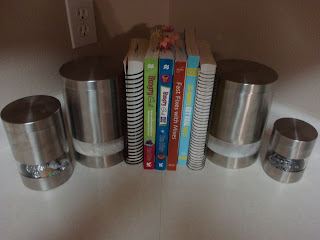
First up we have the ever changing corner of the counter. I took a few of the cookbooks out of our cupboard and sat them in the corner. I used our flour/sugar/etc. containers as bookends.


The wall above our kitchen sink was looking a little bare.


So I took a shelf that we had laying around and put it up (okay, really Lee put the shelf up, he is good at hanging things on the wall). I made some DIY art (look for a future post about all our DIY art coming soon!) and grabbed a few accessories we weren't using and this is how it turned out....

The last two things are a couple updates that we did. We were using a cheap stainless steal container to hold our utensils by the stove. It looked dirty all the time (I am not a big fan of stainless steal) and was not holding up very well. I asked for a new white crock for Christmas and got one from my in-laws. It looks much better!

I recently purchased this awesome white plate from Marshall's for only $4.99. I thought it would be a much prettier way to hold our fruit/veggies on the counter than the mixing bowl we were using. Such a simple upgrade. Have you guys done any easy upgrades to your kitchens recently?

Tuesday, January 19, 2010

Winter Decorating

We are back with part 2 of our winter decor. The first post showed our new winter pillows my mom made.

We added a few more winter touches to the living room. First, the bookshelf....

I bought these wood log looking candles on clearance at Target.


I made these twine trees to add to the rustic winter vibe of the bookshelf.


These pine cones were also on clearance at Target and Lee whipped up a few moss balls for me to add among the pine cones.


Now the side table...

I bought this glass dish at the Dollar Tree and filled it with our wine corks. The texture and the color of the corks fit in with the rustic winter vibe the living room has. The color of the candle matches the next item...the window seat.

My mom made this flannel quilt for Lee. It fits in perfectly folded on top of our tv stand turned window seat. So that is our rustic winter living room decor. Have any of you added any winter touches to your home?

Wednesday, January 13, 2010

Wall Flowers

My awesome hubby bought me these 3 pretty wall vases (from CB2) for Christmas. I found these branches to go in them at Michaels and we hung them in our bedroom.


They look so simple and pretty, I love them!

Thursday, January 7, 2010

Pillow Talk

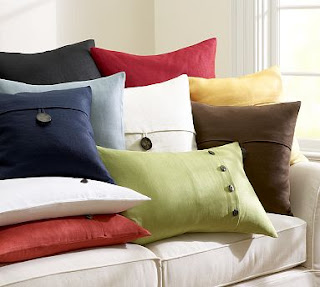
My mom loves to sew. (Don’t even ask how many quilts I have that she has made me over the years!) After getting some inspiration from a Pottery Barn catalog, I asked her to make me some winter pillows for the couch. Here is the Pottery Barn picture…..


I went to the fabric store and bought a couple yards of burlap and brown corduroy. I just showed my mom the picture and she whipped them up.


They turned out pretty good huh? I love them and they look very similar to the expensive Pottery Barn pillows. Thanks mom!

Here are the brown corduroy pillows she made mixed in. She just made simple covers for the pillows we already had.

Finally, I added a pillow I recently purchased on sale (only $5!) at Pier 1. I love how they all look together!


So this is the start of our winter décor. We are working on a few craft projects so stay tuned for part 2 of our winter decorating….